


Learn the basics of using Git in a nutshell.
Since Git is a powerful tool, one of the most popular version control systems today, how can we use it to the fullest? Well before we get into how you can use it, we first have to understand a term that will come in handy for the cases of using Git.
Repository
A repository (also called a repo) is simply a place where you put everything that you want to be tracked by Git. It is simply like a box where you may insert all the files or folders that you want to be tracked (To be honest you won't want everything to be tracked😊😊)
With that said, other terms will get explained along the way for better understanding but don't worry you got this!
Since Git is a software program, it has to be installed onto your computer for you to work with it. So how do you install Git onto your computer?
See the Git homepage for clear and easy installation instructions.
Hope, you're now comfortable with how to install Git. Now it's time to create your first repository.
Create your first Repository
First, check whether you have Git installed on your computer and to do this type the following in the command line:
For all operating systems:
git --version
For UNIX-like operating systems:
which git
At the time of this writing, it might return the following version:
2.39.1
If nothing is returned or the command is not recognized, you may need to install Git on your system by downloading and running the installer, and to do that revisit the Git homepage for exceptionally easy and clear installation instructions.
Now if Git is successfully installed, then it's time to do a little configuration and that is your username and email address. This is because this is important for you to get a better experience with Git when it comes to other settings and many more things that we will discuss as we go together in this.
For now, to set up your name and email address you can type the following into your command line:
git config --global user.name "John Dane"
git config --global user.email johndane@gmail.com
Now, the magic starts!!! Navigate to the directory you want to place under version control or the directory you want to track. On the command line, you might use 'cd' for this:
cd myFolder
Then create an empty Git repository in that folder by typing:
git init
After typing this and hitting Enter, you'll see something like this in your command line:

The initialization creates a hidden folder, .git, which contains the plumbing needed for Git to work. But don't worry about this folder you won't need to interact with it now at least.
Now, that git has been initialized, the whole directory is normally called the "working directory" a term that we will use to refer to the folder where all your files are stored. In this case, (myFolder) is the working directory.
Next, you will need to specify what files in the directory you want to track hence add the desired files to your new repository and this step is worth special care. To help see what files are in the working directory (your current folder) git status will help you view all the files in the directory:
git status
This will return the list of all the files in the working directory as follows (in my case there are only 2 files):
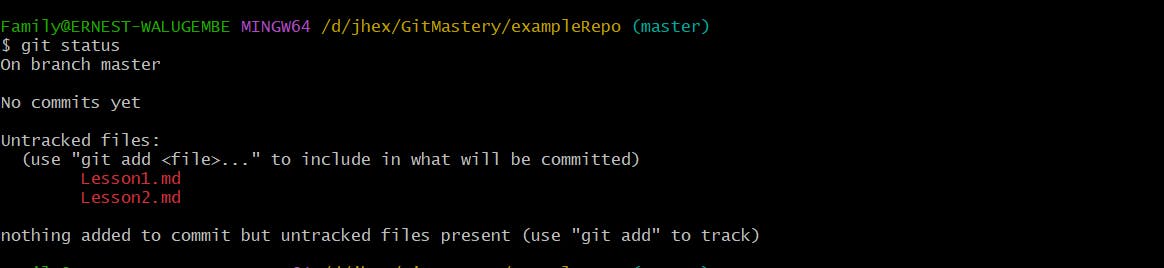
So all the files in our directory have been returned but as the message returned reads, there are untracked files in our working directory and this is because no file has been added yet for tracking, and that's why the two files are in red in the picture above.
So we need to add a file or a list of files so that they can be tracked by Git and we do this by typing git add <file1> in the console.
Let's add one file to be tracked and that is Lesson1.md so:
git add Lesson1.md
Great, you have just added your first file for tracking though we are not done yet. To see the file added you can type git status again. This will return something like this:

However, it's different this time because the file that we added is now in green colour but also separated from the other files that we did not add.
Now, At this point, our file (Lesson1.md) is in the staging area.
The staging area is where your files are prepared to be committed. In simple terms, it is a place where waiters pick up the orders of the customers that are ready to be served to them.
Now it's time to commit the files that have been added to the staging area and that is one file we have. To commit type:
git commit -m "Initial commit"

This creates a new commit with the given message. A commit is like a save or snapshot of your entire project. You can now push, or upload, it to a remote repository, and later you can jump back to it if necessary.
Congratulations, you've just created your first repository and made a commit, Great work.
Summary
To create a repository and also add files for tracking:
Initialize the folder to add Git tracking with
git initCheck out what files you will add to the staging area using
git statusAdd the files you want to track with Git using
git add <file>View the staging area which is all the files that have been added with
git statusCommit the files with a commit message using
git commit -m "Message"
And that's it for the basics of creating a new repository and committing a file.
Hope you've managed to get your head around the basics of creating a new repository.
In the next article, we are going to dig into this newly created repository and see how Git keeps track of your files hence also showing you some great capabilities of these commands.
Follow me on Twitter for more dev tips and tricks.